Translate

Wednesday, January 30, 2013

Sock Monkeys!


I came up with the pattern for these little guys some time ago but had never formally written it down. But now after knitting up some of these playful little imps I managed to write up the pattern to share. Have fun with it. They knit up reasonably quickly and with their long arms they can cling to their Blythe mommies fairly easily.

Working with size 0 double point needles and fingering yarn

Legs

Cast on 4 stitches in white, work in I cord for 6 rounds, snip yarn leaving a 3 or 4 inch tail and then tie on a new color of fingering yarn very close to the work. Gray or brown is traditional for sock monkeys but this new yarn can be any color you like.

Now work 9 rounds in gray, all the while keeping your tied off ends inside the I cord (they will function as stuffing inside the monkey). Cut yarn leaving a 3 or 4 inch end and begin the next leg. When you finish the 2nd leg do not cut the yarn but place the 1st leg you knitted on the same needle and to the right of the new leg. Then continue knitting in I cord with both legs for 21 rounds. Again, carry all your yarn tails up through the center of the I cord (these are the stuffing for the body you are knitting).

Then switch to white and knit 2 more rounds (this is the top of the head). When finished, put the white yarn on a needle and draw it through the loops, snip away any excess strands that you've been carrying up the body and tuck them inside the head, then cinch the head closed and tie it off. You can cinch the feet closed as well, tie them off, and hide all the strings inside the body.

Arms

You knit up the arms the same as the legs, but then sew them onto the sides of the monkey's torso. I generally don't do a bind off for this, I just slip the stitches off the needle and then use the loops to sew the arms onto the body. But if you feel more comfortable binding off the arm before you sew it onto the body, you can do it that way. Again, as with the legs, cinch the hands closed, tie them off and hide the strings inside the arms.

Tail

Do as you did the legs but cast on only two stitches. Cinch the end of the tail closed, hide strings inside the tail, and sew to the monkey's backside.

Mouth

Using white, cast on one stitch then work the stitch as follows... k1, yarn over, k1, yarn over, k1 (all in one stitch).

Work in stockinette for the next five rows, starting with a knit row.

Then on those 5 stitches work as follows...

Purl 2 tog (2x), slip last st unto right hand needle, pass the 1st two stitches over the last stitch. then snip yarn and run the end through the last stitch.

With the stockinette side out, sew the mouth on with the cast off yarn tail and stuff the inside of it with the cast on string. Sew the mouth on below the white cap and about 2 or 3 rows of the gray. Hold it in a oblong shape as you sew it down to get the proper look.

Finishing

To make the ears, put some of the gray fingering yarn on a needle and coming up from the back of the neck, make 3 or 4 loops, one over the other, on either side of the head just above the mouth.

Use red embroidery floss or fingering yarn to make mouth, loop the floss about three times around the mouth and make one loop around the front of the mouth to catch the floss in the middle and keep it from moving around.

Use black embroidery floss or fingering yarn to make eyes and nostrils.

For all off these start and end the yarn or floss at the back of the neck. When finished, tie it off, and then hide the ends in the body.

For the white behind the eyes version (see pic), knit the body color for only 18 rounds and the white of the head for 5 rounds.


Here's a few (hopefully) helpful pics to show how these little guys knit up...


Here's the leg knitted in I cord, as you can see the tied off ends are carried up in the middle of the cord as it is worked. This gives the leg a little bit of filler.


And here's where you slide the first leg on the needle to the right of the second leg and continue knitting with both together forming the torso.


And the body itself. Again the tail ends are carried up through the middle of the I cord as you knit it, stuffing the body as you go.


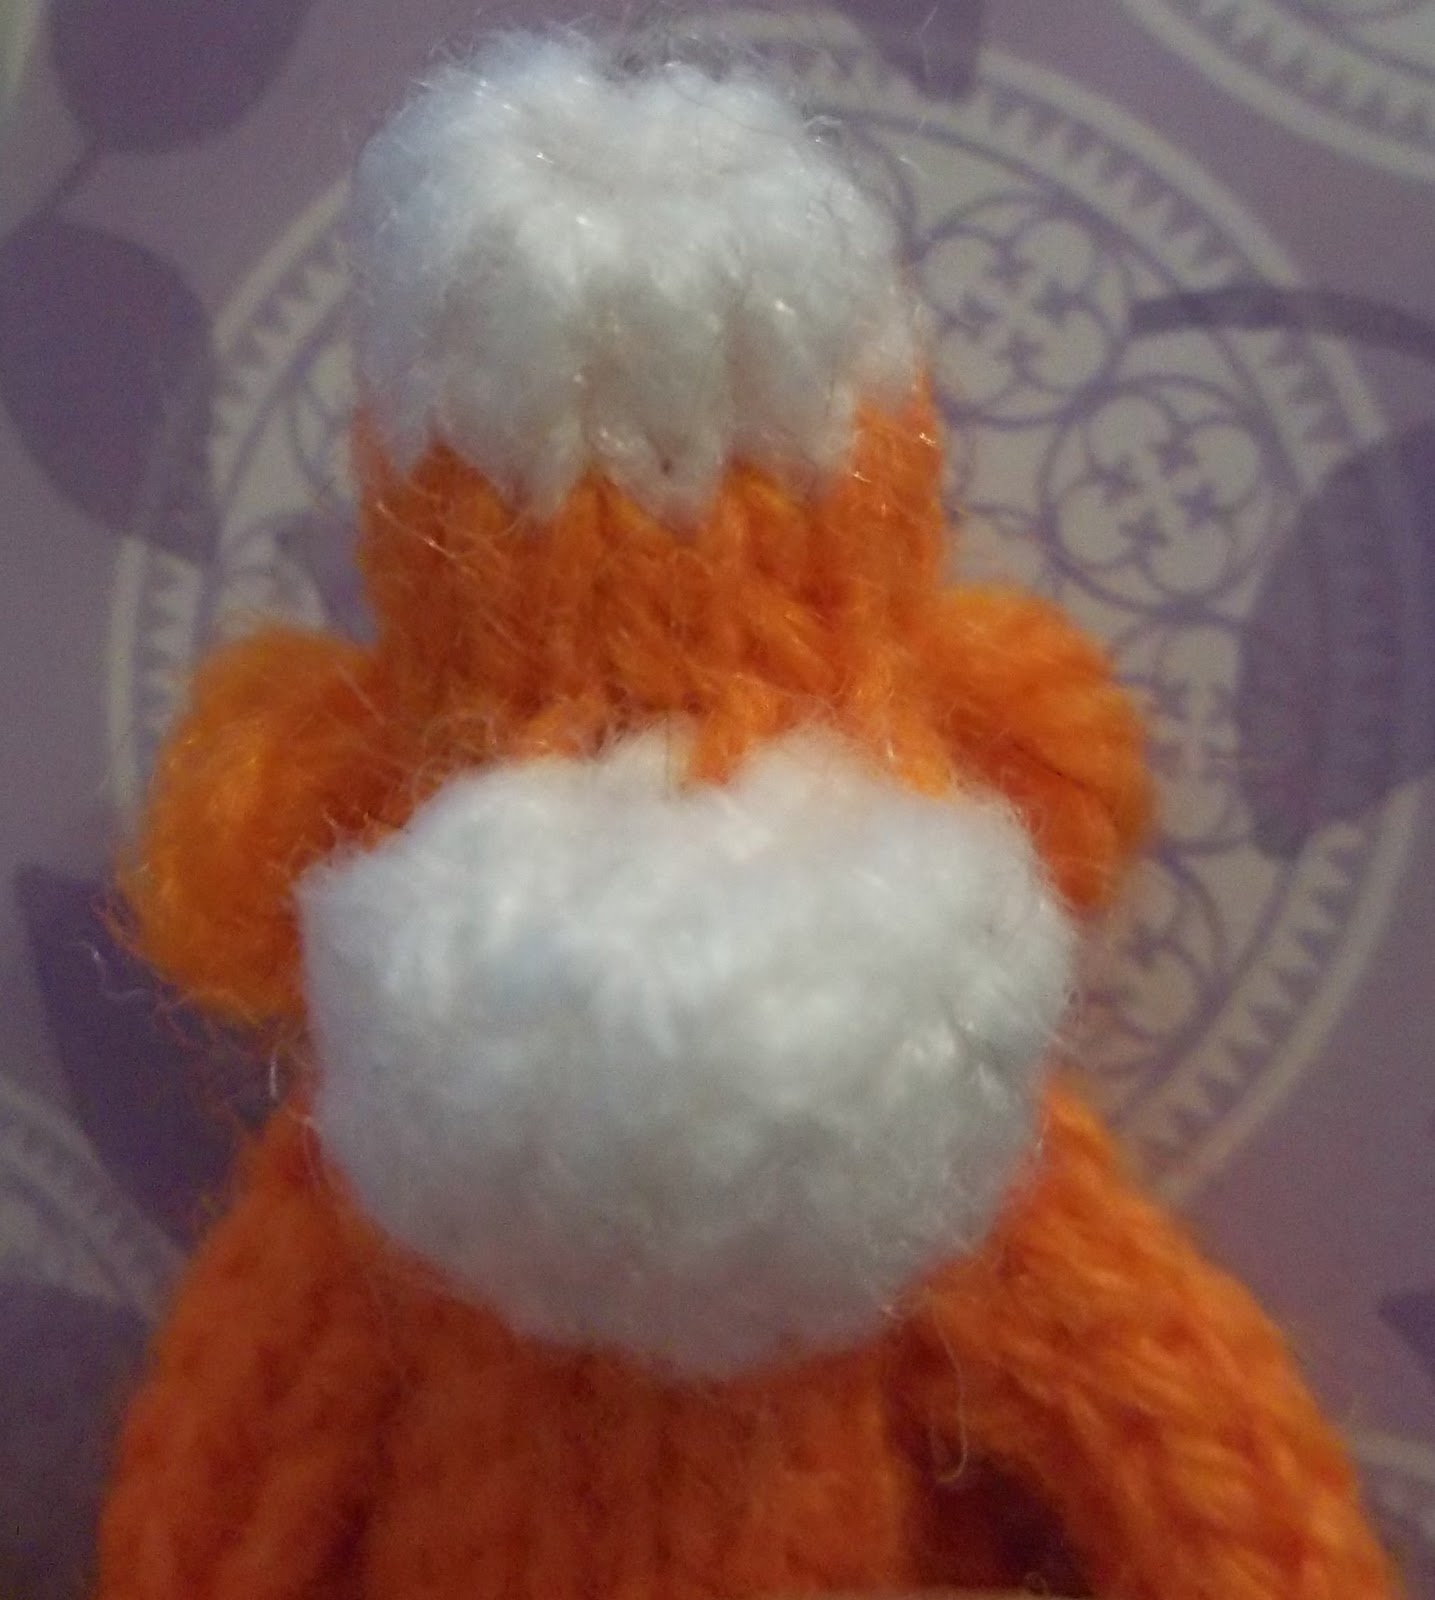
Here's the placement of the arms and mouth.


And here's how you place the ears. Start the yarn from the back of the neck and then bring it out on one side where you want the bottom of the ear to start. Then go upwards making a loop for the ear. Then draw the needle down from where you want the top of the ear to be, to the bottom of the ear on the other side. Then go up making a loop for the other ear. Continue in this diagonal criss cross fashion until you've made a couple of loops on each side. Then bring the yarn to the back of the neck for the tie off.


And here's his cute little face. Note the tiny loop in the front to keep is mouth from moving around too much.

You can tug a little on his ears to even them out if you need to. Actually tugging on these little guys ears is quite fun.

Hmmmmm... reminds me of those irritating Aunts that that used to tug on my cheeks as a kid. Perhaps a bit of that's coming out now

Well that's about it, if you have any questions please ask. And again, enjoy : )


If you want to sell finished products made from my patterns you may, but please give me credit as the designer in all listings. The pattern itself is copyrighted and no part of it may be reproduced (by any means) for sale. © Monica Bovee


Friday, January 18, 2013

Sweets for the Sweet

I recently decided to make some custom candies for my Blythes. And being the big Doctor Who fan that I am, the obvious choice was da da da DA! Jellybabies!


I was so pleased with how they turned out I decided to post how I did it. The same technique can probably be used to make other jelly type candies, like gummy bears or peachy O's.

Now obviously getting them as small as they needed to be, and uniform in shape, was the tricky bit. I molded a single one in polymer clay and used E600 to attach it to the end of a toothpick making a very tiny Jellybaby stamp. When the glue dried I mixed together some Amazing Mold Putty and formed it onto a little pad. Then I repeatedly pressed the stamp into the mold putty before it set up. The resulting flexible mold looked like this...


I've made molds with this product before and they generally work quite well. The molds are supposed to be food safe and can even be heated in the oven for up to 395 degrees F, which is just perfect for the purpose of melting polystyrene crystals (or those little crystals you get in those Makit Bakit kits that melt at 375 F).

I've made full size molds from actual Jellybabies in this fashion that turned out beautifully and made very cool jewelry. But I quickly discovered that the size of the mold makes a big difference in how the crystals melt together... with larger molds, like the full size Jellybaby, they melt just fine. But in these miniscule molds you can only fit in about 2 or 3 crystals per impression... and then when you do try to melt them they sort of just soften into little molten balls but don't combine together. The trick to solving this is simply increasing the amount of surface area per crystal, I used pliers to cut the crystals into smaller chunks and then filled the cavities with the bits.

A word of warning... these molds, though supposedly safe at these higher temperatures, do emit a funky odor. It dissipates quickly enough, but just FYI.

And when they were finished they turned out like this...


Here's a finished Jellybaby in a Blythe hand : )


Oh, and if you need a little candy bowl to keep them in...


This one was made by melting a circle of the clear glitter crystals on foil into a nice flat round, and then after it cools you place it over a stack of dimes and pop it back in the oven until it droops over the stack, making a little fluted bowl. Oh, make sure it's completely cooled before you remove the dimes.... getting burned by a hot handful of dimes will make you feel like a right idiot.

And there you go, candy for your dolls : )

Thursday, January 17, 2013

Cherri


What can I tell you about this girl... well, first and foremost she wears wigs, all sorts of wigs, and I swear to God she's picking them out herself. It doesn't seem as if she cares at all that sometimes they are quite obviously wigs. "Mom that's not the point" she says "of course everyone can see it's a wig... what, do you think people believe I sprout a new color of hair every week?"

But before I go any further into this girl's wig fetish I suppose I should begin at the begining and explain how this fixation with unrooted hair got started.

Cherri started life as an ADG medieval mood. I named her Veronica (which somehow never really seemed to suit her) and then proceeded to trim her uneven bangs... later I trimmed the unruly (and oddly somewhat beef Ramen smelling) ends of her tresses. Then a bit more trimming here.... a bit more there. I was never completely happy with the way her hair looked or felt, so I just kept trimming away at it until, well, until there simply wasn't any left to speak of.


Now don't get me wrong, I love ADGs. The more subtle smile and the more serious look on their little faces has an appeal all it's own. And the serious look she gave after I had deforested her locks was one that indicated it was time for a change.

And so it began. I changed her skin color, and gave her a whole new face up. Like Wren she also had a penchant for purple... unlike Wren (who at one point after leading me in how she wanted to look finally said "that's it, I'm finished, this is who I am") Cherri always seems to be in a state of flux.

I thought perhaps I was going mad... why was I always changing this girl? I wasn't unhappy with her, and she certainly was very pleased with herself, but over time there was always this push for change; a tweak here or there in her face up, new eye chips, another wig, okay good, now another one. She would flit to a new look and then back to an old one whenever it suited her... it never seemed to end. And then one day I had an epiphany...


She's not searching for who she is, she knows who she is, she is change. Pure and simple. She becomes what she wants when she wants, despite anything I or anyone else might say about it. If it pleases her, she does it, she doesn't care if anyone likes it or not.


And I don't know... perhaps it's therapeutic for me. Just when I think I'll never do any more customizing she gives me that insistent look that gets me motivated again. Just when I think.... what would anyone do with that fabric, she whispers in my ear what she would have done with it and I get to work. Her determination to follow her bliss keeps me on my toes. Not a bad thing during those long winter blahs when the less demanding dolls are just standing around in their cabinet and involved in their own affairs. Cherri pushes for that creative impulse that cannot be denied, that spark that lets you know that it's the process itself, rather than any ephemeral goal, that matters.


And that's when you know you're doing it right.

Sunday, January 13, 2013

A Surprise for Blythe...

I don't know how many of you are familiar with Elizabeth Zimmerman.

If you are a knitter you have probably worshiped at the alter of this woman's talent at one time or another, if not, then you probably have no idea who she is, or how she revolutionized knitting in America.

But I wont spend long here talking about this woman's amazing talents (though that would be fun too). I will simply mention one of her most inspired patterns, the Baby Surprise Jacket

This little beauty knits up to look something like a striped blob... more like some exotic sea creature than an actual article of clothing. But once the knitting is finished, you do neat little origami like fold and a quick bit of seaming along the sleeves and presto! You have a gorgeous little jacket... and if you used a self striping yarn, you generally find that the colors have distributed themselves evenly in a aesthetically pleasing pattern.

Now what, you may be asking yourself, does any of this have to do with Blythe? Just this. A very talented Ravelry member Yvonne Wakefield, has posted a miniaturized version of the pattern that can be knitted up for dolls. You can imagine my excitement! I could finally make surprise jackets for my Blythes! Now you will need a Ravelry account to access the pattern, and it was not originally written with Blythes in mind but with a bit of tinkering I came up with this...


I used size 0 needles and superfine #1 yarn (fingering). The pattern comes in three sizes and I used the middle size to create this jacket. As you can see, it wears like a bolero and the colors distributed themselves quite nicely. I will most certainly be making more of these little guys. They knit up so quickly and are such great fun to do. So many thanks to Yvonne Wakefield for making this patten available for dolly use : )

Oh, and if any of you out there collect Leggys or Leggy-like dolls....


This is Vespa, my 1972 Leggy doll. Using the same needle size and yarn, the smallest size in the pattern will fit one of these girls perfectly. : )


Lady Leopy

This beautiful creature is Lady Leopy, a custom Blythe by oTto kiNDeR...


As I understand it she was originally a V Smash, now that's quite a transformation!
 

I'd seen many gorgeous customs out there, but the day I saw her I was stunned. I immediately called my husband over and much to my amazement his first words at seeing her were "bid on her". Now I'd shown him customs before and while he admired what people could do with customizing Blythes he'd never once been moved enough to tell me to actually bid on a doll that someone else had done.


But as you can see a girl like this is one of a kind.

I suppose I should mention that my husband and I are very fond of cats. Well... fond might be an understatement, we own nine cats. But before anyone jumps all over us about this, let me make it perfectly clear that they are all fixed (we're not running a cat farm here). And well, with my love of Blythe and my love of cats this girl was certain to catch my attention.


Of course I had no idea that for my husband (who likes Blythe well enough but had never had any particular attraction to any one of them) would outright tell me to bid on one. But there you go........ Cat + Blythe = "bid on her", and we've never been so pleased.


And our cats were pretty happy about it too. : )

Monday, January 7, 2013

Star Knit Hat for Blythe

I came up with this pattern a while back and used it recently in a rather fun Autumn themed Blythe swap. It's a cute little number and once you get used to the star knit pattern they knit up pretty quickly. These are shown in the autumn colors of the swap but you can vary the colors to match the season of course...


And there is even a petite variation : )


Star pattern--

1st row (right side) knit
2nd row p1, * make star, p1. Repeat from * to end.
3rd row knit
4th row p3, make star, * p1, make star. Repeat from * to last 3 stitches, p3.

Make star = p3tog leaving stitches on the needle, yrn, then purl the same 3 stitches.
for 2 color star stitch work rows 1 and 2 in one color and rows 3 and 4 in another.
yrn = A yarn over between two purls. The yarn is brought around the needle
counterclockwise.

Cast on 17 stitches in worsted yarn on size 8 needles.

Work in two color star pattern for 11 and one half repeats, so you can end with the same color you started with.

Bind off. Fold in half (short side touching short side) and sew up the back, making a pointed hat.

Then using size 3 needles do a 3 stitch i cord along the bottom edge of the hat.

Then do a 3 stitch i cord around the face area of the hat, starting with plain i cord on it's own until it's long enough to reach from under the bottom corner of the hat to under the middle of the doll's chin (just under 1 and 1/2 inches).

Then continue the i cord on the front of the hat itself. When you get to the end, do i cord on it's own (again for about another 1 and 1/2 inches). Leave enough yarn at each end of the i cord to tie a little bow under the doll's chin. Tie little knots at the ends of the yarn.

For a Petite Blythe or barbie variation use sock or fingering yarn and size 1 needles. Work for 9 and one half repeats, and do the 3 stitch i cord also with size 1 needles. This time when you do the 3 stitch i cord around the face area of the hat, you start with plain i cord on it's own for about 1/2 inch. When you get to the end of the front of the hat do the i cord on it's own for another 1/2 inch. Again, leave enough yarn at each end of the i cord to tie a little bow under the doll's chin. Tie little knots at the ends of the yarn.

If you want to sell finished products made from my patterns you may, but please give me credit as the designer in all listings. The pattern itself is copyrighted and no part of it may be reproduced (by any means) for sale. © Monica Bovee


Sunday, January 6, 2013

Imagine Dragons

Well Cookie went with my husband and I to the Imagine Dragons concert. If you've never heard of this band you can see them here. 


It was an absolutely awesome night. Here's Cookie riding in Aaron's pocket.


And here she is looking down at the band... sorry flash photography sucks in close up shots.


Oh yes, Aaron thought she should ride in my... um... pocket too


Poor little thing, she couldn't make it through the whole night, here she is crashed out on my bag. We got home by about 2am....


In the end I think she enjoyed it too. She insisted on keeping the tickets. I think she's going to put them up like posters : )